A complete guide to disable the WER from of Windows 7& 8.x
Step 1
- Click on Start > Control Panel > Action Center > Change Action Center Settings.
- Click on the "Problem Reporting Settings".
- Select "Never Check for Solutions".
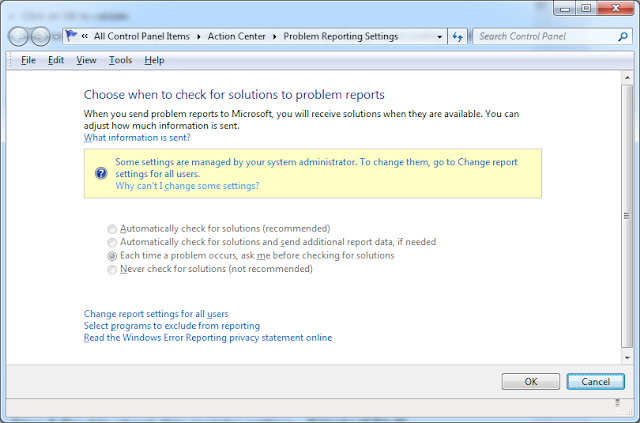
- Click on OK to validate
- Additionally : You can change this for all users as well by Clicking "Change report setting for all users".

Step 2
- Click on Start > Run > Type "services.msc"
- In the window that opens (Services), look for the following entry in the the right pane:
- "Windows Error Reporting"
- Double-click on this entry and set the "Startup type" status as "Disabled".

- Click on OK to validate.
- "Windows Error Reporting"

Step 3 Double check this registry setting - EXHAUSTIVE
Best to do a search for Windows Error Reporting, and you find the key stems
- HKEY_CURRENT_USER\Software\Microsoft\Windows\Windows Error Reporting
- HKEY_LOCAL_MACHINE\Software\Microsoft\Windows\Windows Error Reporting
Type "Regedit" and press "Enter."
Navigate to "Hkey_users\S-1-5-19\Software\Microsoft\Windows\Windows Error Reporting" and the above keys.
Right-click "Disabled" and change the value from "0" to "1".
Next Key
Navigate to "Hkey_users\S-1-5-19\Software\Microsoft\Windows\Windows Error
Reporting/Consent"
Set to 1
Consent\DefaultConsent REG_DWORD
Possible values:
1 - Always ask (default), 2 - Parameters only, 3 - Parameters and safe data, 4 - All data
Next Key
Navigate to "Hkey_users\S-1-5-19\Software\Microsoft\Windows\Windows Error Reporting/DefaultOverrideBehavior"
Set to 1
Consent\DefaultOverrideBehavior
REG_DWORD
Possible values:
0 - Vertical consent will override the default consent (default)
1 - Default consent will override the application-specific consent
Press the "Windows" key and "R" key simultaneously.
All Values Registry Values here ....
- HKEY_CURRENT_USER\Software\Microsoft\Windows\Windows Error Reporting
- HKEY_LOCAL_MACHINE\Software\Microsoft\Windows\Windows Error Reporting
Best to do a search for Windows Error Reporting, and you find the key stems
Navigate to "Hkey_users\S-1-5-19\Software\Microsoft\Windows\Windows Error Reporting" and the above keys.
Right-click "Disabled" and change the value from "0" to "1".
Next Key
Navigate to "Hkey_users\S-1-5-19\Software\Microsoft\Windows\Windows Error
Reporting/Consent"
Set to 1
Consent\DefaultConsent REG_DWORD
Possible values:
1 - Always ask (default), 2 - Parameters only, 3 - Parameters and safe data, 4 - All data
Next Key
Navigate to "Hkey_users\S-1-5-19\Software\Microsoft\Windows\Windows Error Reporting/DefaultOverrideBehavior"
Set to 1
Consent\DefaultOverrideBehavior
REG_DWORD
Possible values:
0 - Vertical consent will override the default consent (default)
1 - Default consent will override the application-specific consent
Press the "Windows" key and "R" key simultaneously.
All Values Registry Values here ....
Step 4 Disable Task Scheduler for Error Reporting Service

- Step 5 Permanently Disable Windows Error Reporting Service
To permanently Disable Windows Error Reporting Service, delete all keys under this folder LocalDumps.

-
Step 6 Clean these directories out
Step 6 Clean these directories out
C:\ProgramData\Microsoft\Windows\WER\ReportArchive
C:\ProgramData\Microsoft\Windows\WER\ReportQueue
C:\Windows\LiveKernelReports\WATCHDOG
![[Image: AdwCleaner Icon]](https://lh3.googleusercontent.com/blogger_img_proxy/AEn0k_uXXViYK_WI5vTyUMA8modTAnJLp5301X0aTiRTpLCmNKF6d_3lLYL-Ty5OsI7xNViI-TnzMk1wuZ3qUhZljcMWA_rwiNnWCJD-XsURQ2y2dZBXDGLJz2r9Iw4I-HxalqQjEHHQQdUCpjdyspU2lg=s0-d "AdwCleaner Icon")
![[Image: AdwCleaner scanning for DivX Toolbar]](https://lh3.googleusercontent.com/blogger_img_proxy/AEn0k_s9Gq9SOzghQz1KwRAZiiOpgoQrojFZH-wCjffRloR22kgVlmLskhppyNeD9VDT0LNVwlJA-0Z69_j699HfI66gOSuvICNZRi4dre9QTwj9axGpOl0RDdiv3z4LaXkEGTmXi3rsE12P3tNKPZ7rag=s0-d "Click on Search to scan for DivX Toolbar")
![[Image: Adwcleaner removing DivX Toolbar]](https://lh3.googleusercontent.com/blogger_img_proxy/AEn0k_vhEp5TSBaLp8T14z04MqmuBsMCmtQzWqZ1vTT-Vu7H6bcaZBBorPTgNfheNRka4lMzAsg6mJYB8L3jNRpGghajCthE9F7Y1EW1_uO23WlcBFp8ONfvDx1EbLrlOo7X0PRV6jnYqLiIc2XXdAD5Io44Uz8ZmDvhlA=s0-d "Click on Delete to remove DivX Toolbar virus")
![[Image: Junkware Removal Tool]](https://lh3.googleusercontent.com/blogger_img_proxy/AEn0k_sGLO8XnBqJjSdTIVVl1QdUVA8JP0YWTY1hg9p0aVPTg23kC1K223oGkddolZrUVplwjThELgCaDA9cAanSxMObgPgC7VUbpM7WiLNRYU7DH0l0aCp4ZyFk-iu3_EEIN5Mr5YWKQz84QWgQRw=s0-d "Double-click on the Junkware Removal Tool utility")
![[Image: Junkware Removal Tool scanning for DivX Toolbar virus]](https://lh3.googleusercontent.com/blogger_img_proxy/AEn0k_uTxyOpCenkyCj1dxH9yknlD-p4joJ5zaaTod2MG-5bvqhodM7dDOwuAiGBRmD68qVw5f3ZucCtgK5PmedcA_3hk187W-bg-w2312zPdyydUpMPsNbINxm--5TdKNDq26HpxYbq_05txp7GXRvR9B6GQRPm=s0-d "Junkware Removal Tool scanning for DivX Toolbar")
![[Image: Junkware Removal Tool final log]](https://lh3.googleusercontent.com/blogger_img_proxy/AEn0k_tUbXaK_Z-CYKPRVEHEi1zsBgSe_96gElXnwi2u81EonqaE3r1R6zWs8lbJPwmHBjiKFnX3wjSn8EVhH1y27eyyQXe4lyGzObNCQ2-BzQyqUo6ViLttSEsn3K33rQHRjhVwjb8TwzQOX4JV1A=s0-d "Junkware Removal Tool final log")