Wednesday, April 30, 2014

1-Click Installer for Presenters Desktop Shortcuts Tool Windows 7,8,8.1 (x64)

This utility is designed for Professional Presenter, Speakers and Instructors and Online Course-ware Developers (Mooks) to get quick access to common tools they use. 

Update : Windows 10 version

This tool installs a "Presentation Apps" Context-Menu accessible from you Windows Desktop that contains the following handy shortcuts too; 
  • Calculator
  • Control Panel Properties to Mouse, Sound, and Display (to extend it)
  • Magnifier (to zoom in on parts of the screen, during presentation)
  • Snipping Tool (create presentation, capture portions of screen)
  • Problem Steps Recorder - annotate full screen captures 
  • Screen Recorder - Record screen into a movie using free Microsoft Expression Encoder 4 Screen Capture - you must first install Microsoft Expression Encoder 4 with Service Pack 1 (SP2) free version records 10 mins at a time.
  • Window Media Player (play audio and video files)
  • Wordpad (quick annotations)


This utility has the following features; 

  • works Windows 7,8, 8.1, Server 2012, 2012 R2 but only 64-bit version
  • adds link to Microsoft Expression Encoder 4 Screen Capture (must be installed)
  • comes with proper uninstaller located in "Add or Remove Programs" oops Programs and Features

Prerequisite (kinda)

Download and Install Microsoft Expression Encoder 4 with Service Pack 1 (SP1)
It's free from Microsoft and works on Windows 7,8,8.1, 2012, 2012 R2, with one caveat; the free version records only 10 mins at a time.  But it contains no malware, viruses, or bloatware (OpenCola, Conduit).

NOTE: If you don't install the Screen Recorder link will simply not work.

Install

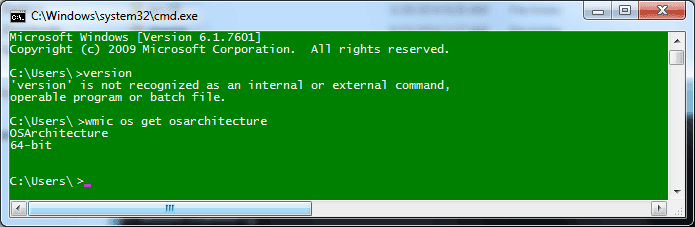
Download file for Windows 7 (64-bit) and unzip PresentationAppsWin7.zip.

Download file for Windows 8+ (64-bit) and unzip PresentationAppsWin8.zip.
Simply, right-click onPresentationAppsWin(7or8).inf and click Install.


Confirm UAC Installation (click yes).

Done.


Confirm Install 

To test this now right-click on the Desktop and you see the new context menu "Presentation Apps" option!


Uninstall

The great thing about this inf file, is it creates a uninstall option.

Goto Programs and Features, and double-click "Desktop Presentation Apps Context-Menu..." to uninstall.


To remove this blog page (only) IE tab on start-up follow http://windows.microsoft.com/en-us/internet-explorer/change-home-page#ie=ie-11. I couldn't remove this key in the registry using inf.


Sunday, April 27, 2014

Open Notepad as Administrator in Windows 7+ w/ Installer, Uninstaller

"Open in Notepad as Admin" in Windows Explorer Context-Menu

Update 11-20-2017 - New installer see my new post. Each major update you have to re-install this, so for Creator Update and Fall Creators Update,etc.

Do you get the following;
  • "Would you like to save in the My Documents instead?"
  • "Access Denied" when saving a file ? 
  • or simply need a quicker menu option to Send to Notepad but as Administrator


This utility installs "Open in Notepad as Admin" context menu item in Windows File Explorer for files (right-click on file) that can normally be opened with Notepad (but run as Administrator).

Opening files in Notepad 
with Administrator privileges allows you to open/save files in privileged areas such as C:\Windows\System32 and
C:\Users\ {UserName} \AppData\Local\Microsoft\Windows\Temporary Internet Files.   

Notepad can edit traditional 8-bit text files as well as Unicode text files (both UTF-8 and UTF-16, and in case of UTF-16, both little-endian and big-endian). 

This utility has the following features; 

Does not install any software, just a registry setting which comes with an uninstall option.

Bonus: 
  • Works in Windows 7, Windows 8, Windows 8.1, Windows 10 (and Server Versions).
  • adds Notepad Icon to context-menu !!!
  • comes with proper uninstaller located in "Add or Remove Programs" or Programs and Features


Install

Download and unzip file OpeninNotepadAsAdmin.zip.

Simply, right-click onOpeninNotepadAsAdmin.inf and click Install, that's it. Done.


To test this now right-click on a text file and you see the new context menu "Open in Notepad as Admin" option!


Uninstall


The great thing about this inf file, is it creates a uninstall option.
Goto Programs and Features, and right click on the "Open in Notepad as Admin..." to uninstall.


To remove this blog page (only) IE tab on start-up follow http://windows.microsoft.com/en-us/internet-explorer/change-home-page#ie=ie-11. I couldn't remove this key in the registry using inf, since it would delete all pages.

Inspired by
http://msdn.microsoft.com/en-us/library/windows/desktop/cc144171(v=vs.85).aspx

http://technet.microsoft.com/en-us/magazine/2007.06.utilityspotlight.aspx
http://msdn.microsoft.com/en-us/library/windows/hardware/ff546320(v=vs.85).aspx

Friday, April 25, 2014

Running Internet Explorer 32-bit or 64bit for IE Toolbar Developers

Which one should I run? 

As of  Internet Explorer (IE) 10+, Microsoft has change the way IE Managed Process is run.

If you are using a Windows 64-bit version,  IE will always run as a 64-bit process.


To check if you run what Windows architecture you are running

Start->Run-> Type CMD and cut and paste the following


wmic os get osarchitecture


So if you manually launch Internet Explorer from this 32-bit folder, 

C:\Program Files(x86)\Internet Explorer\iexplore.exe

on Windows 64-bit version, it will run the 64-bit version located here
C:\Program Files\Internet Explorer\iexplore.exe


Tip-of-the-hat to this excellent article by Eric Law at IEInternals blog:

http://blogs.msdn.com/b/ieinternals/archive/2012/03/23/understanding-ie10-enhanced-protected-mode-network-security-addons-cookies-metro-desktop.aspx


Pinning Apps to the Start Screen in Windows 8.1 Registry Setting, Group Policy, C#, Visual Studio

Pinning Apps to the Start Screen in Windows 8.1

Installing new applications in Windows 8.0, would result in a tile being automatically pined to the Start Screen, which resulted in a very wide screen to scroll. 
To combat this, Windows 8.1 decided to categorize our Apps for us (by name, by date installed, by usage and by category). In this thread I am installing XML Notepad 2007 (shout-out: udpate this app!)
Under Windows 8.1 apps are 
no longer automatically pinned to the Start Menu and it is therefore up to the user to manually pin the apps to the Start Screen. 


Wisely, Microsoft has provisioned for enabling applications to be pinned to the user’s Start Screen, but it's not easy for a developer. Ideally, it would be placed in the App's Manifest
AppxManifest.xml or {YourAppName}.VisualElementsManifest.xml along with other pin target locations, but that would be to logical. 


A new 
Group Policy setting to pin specified applications to the Start Screen has been introduced.  The “Pin Apps to Start when Installed” policy allows enterprises to have a level of freedom in customizing their own Start Screen whilst ensuring that a standard set of corporate applications are pinned to the Start Screen.

Windows 8.1 has introduced 5 new Start Menu Group Policy Objects/Registry settings in relation to the Windows 8 Start Menu. You can find them by searching for these values in the registry;
  1. StartPinAppsWhenInstalled
  2. LockedStartLayout
  3. GotoDesktopOnSignin
  4. ShowAppsViewOnStart
  5. DisableGlobalSearchOnAppsView

In Group Policy Editor (gpedit.msc) Pin Apps to Start when Installed”  which is an Administrative Template.Administrative Templates / Start Menu and Task bar / Pin Apps to Start when Installed 


The policy requires the individual AppID’s to be specified in the policy and is located in the following location (User or Computer configuration).
Many of the AppIDs have namespaces (like Microsoft.InternetExplorer.Default) that we might expect to see in an App Package Manifest, but the XML Notepad AppID is different. 
It represents a file system location.

  {7C5A40EF-A0FB-4BFC-874A-C0F2E0B9FA8E}\XML Notepad 2007\XmlNotepad.exe
Is the same as on a 64-bit machine; 
  C:\Program Files (x86)\XML Notepad 2007\XmlNotepad.exe

and what  a 32-bit machine,
  C:\Program Files\XML Notepad 2007\XmlNotepad.exe

The policy requires an AppID per shortcut and this can be obtained from the XML generated by running the following PowerShell command on the reference computer:
Export-StartLayout –As XML –Path .\MyStartMenuLayout.xml

Get-StartApps   - gets a full list of AppIDs
You can also run the Get-StartApps CmdLet to list all the applications (with their AppID’s) currently pinned on the logged on user’s Start Screen.
Windows 8+ now uses “Known Folder ID’s” which are an evolution from the earlier CSIDL folders used in mapping an alias to a physical file location on a local drive.

So {7C5A40EF-A0FB-4BFC-874A-C0F2E0B9FA8E} represents the Program Files (x86) folder many those are list at

For developers, since GPO is just a registry setting, you can programmatically 
pin installed Apps to the Start Screen by setting this Windows 8.1 Registry Setting before hand using this registry key;

  1. HKEY_CURRENT_USER\Software\Microsoft\Windows\CurrentVersion\Group Policy Objects\{8E168A82-6D8B-435B-88AA-96557FEE449E}Machine\Software\Policies\Microsoft\Windows\Explorer\StartPinAppsWhenInstalled
  2. HKEY_LOCAL_MACHINE\SOFTWARE\Policies\Microsoft\Windows\Explorer\StartPinAppsWhenInstalled
  3. HKEY_USERS\S-1-5-21-2968750198-2704521508-3360548841-1001\Software\Microsoft\Windows\CurrentVersion\Group Policy Objects\{8E168A82-6D8B-435B-88AA-96557FEE449E}Machine\Software\Policies\Microsoft\Windows\Explorer\StartPinAppsWhenInstalled
Add String Key="1"
with
Value="{7C5A40EF-A0FB-4BFC-874A-C0F2E0B9FA8E}\XML Notepad 2007\XmlNotepad.exe"


And finally, after setting the above and re-installing XML Notepad, you get the desired result. 


Wednesday, April 23, 2014

Spring Windows 8.1 Disk Cleanup - A detailed look at Disk Cleanup "Files to Delete" categories

Update for Windows 10 Disk Cleanup has new categories, read my post here.

Right click on the C:/ drive to bring up the following well know dialog box with General Tab selected and click Disk Cleanup button.


Disk Cleanup to analyze the selected drive and display what can be cleaned up. A progress bar is shown during this process. Wait for this to finish.


When done, Disk Cleanup shows the total amount of space that can be freed up. Then, in the 'Files to delete' section you see different types of files that can be deleted. 

This will include categories such as
'Downloaded Program Files''Recycle Bin''System error' files, 'Temporary files' and others. For each category of items, you see how much space they occupy at the moment. 


Disk Cleanup wizard detects outdated files that can be delete, so if the category appears you can select those files to be deleted.
Recommendation:
 
 Select all categories to delete all the files, but review the categories below for further details. 

Extra : Click 'Clean up system files' button (to save allot of gigs of space) - see below.


Detailed Explanation of 'Files to Delete' Categories:


Category Description
Download Program Files Downloaded Program Files are ActiveX controls and Java applets downloaded automatically from the Internet with you view certain pages. They are temporarily stored in the Downloaded Program Files folder on your hard disk.
Temporary Internet Files The Temporary Internet Files folder contains webpages stored on your hard disk for quick viewing. Your personalized settings for webpages will be left intact.
Offline Webpages Offline pages are webpages that are stored on your computer so you can view them without being connected to the Internet. If you delete these pages now, you can still view your favorites offline later by synchronizing then. Your personalized settings for webpages will be left intact.
Debug Dump Files Files created by Windows.
Recycle Bin The Recycle Bin contains files you have deleted from your computer. 
Setup Log Files Files created by Windows.
System Error Memory Dump Files Remove system error memory dump files.
System Error Minidump Files Remove system error minidump files.
Temporary Files Programs sometimes stores temporary information in the TEMP folder. Before a program closes, it usually deleted this information. You can safely delete temporary files that have not been modified in over a week.
Thumbnails Windows keeps a copy of all your picture, video, and document thumbnails so they can be displayed quickly when you open a folder. If you delete these thumbnails, they will be automatically recreated as needed.
User File History Windows stores file versions temporarily on this disk before copying them to the designated File History disk. If you delete these files, you will lose some file history.
Per User Archived Windows Error Report Files used for Windows Error Reporting (WER). These are logs of errors (program crashes mostly) that were reported to Microsoft by the Windows Error Reporting service.
Per User Queued Windows Error Report Files used for Windows Error Reporting (WER) and solution checking. 'Queued' just means that it contains error reports that haven't been sent yet for whatever reason, and as such have been stored locally on your hard disk, waiting to be sent.
System Archived Windows Error Report System Archived files used for Windows Error Reporting (WER).These are logs of errors (system crashes) that were reported to Microsoft by the Windows Error Reporting service.
System Queued Windows Error Report System files used for Windows Error Reporting (WER)'Queued' just means that it contains error reports that haven't been sent yet for whatever reason, and as such have been stored locally on your hard disk, waiting to be sent.


'Clean up system files' button you see the following dialog box


This will include categories such as'Windows Update Cleanup''Windows Defender'and others. 

Windows Update Cleanup only appears in the list when the Disk Cleanup wizard detects Windows updates that you don't need on your system.  This category will generally save you the greatest amount of space. All of these are okay to delete, that is the purpose of this wizard. 

Recommendation:  Select all categories to delete all the files, but review the categories below for further details. 

Detailed Explanation of 'Clean up system files' categories

Category Description
Windows Update Cleanup Windows keeps copies of all installed updates from Windows Update, even after installing newer versions of updates that are no longer needed and taking up space. (You might need to restart your computer.)
Device driver packages Windows keeps copies of all previously installed device driver packages from Windows Update and other sources even after installing newer versions of drivers. This task will remove older versions of drivers that are no longer needed. The most current version of each driver package will be kept.
Windows Defender Non critical files used by Windows Defender
Windows upgrade log files Windows upgrade log files contain information that can help identify and troubleshoot problems that occur during Windows installation, upgrade, or servicing. Deleting these files can make it difficult to troubleshoot installation issues.
Service Pack Backup Files Windows saves old versions of files that have been updated by a service pack. If you delete the files, you won't be able to uninstall the service pack later.


When you click OK, Disk Cleanup will prompt you to confirm that you want to permanently delete the selected files. 


If you have never done, you'll be surprised at the Gigs of space freed up. 

Extra: You can automate Disk Cleanup to run monthly. Follow instructions here - http://windows.microsoft.com/en-us/windows7/schedule-disk-cleanup-to-run-regularly


Monday, April 21, 2014

Cleanly exiting and restarting Windows File Explorer

Windows 8+

Cleanly Killing the Explorer Task


To cleanly exit Explorer process in Windows 8, right-click on task bar while simultaneously hold down keys <Ctrl><Shift>, to reveal Exit Explorer.


Windows 8+

Restarting the Explorer Task

Windows 8 Task Manager comes with a built-in option to direct restart Explorer.
To get this feature, simply follow these simple steps:
1. Right-click on Taskbar and select Start Task Manager or press <Ctrl><Shift>keys.
2. Make sure you are on the "Processes" tab.
3. Now look for "Windows Explorer" process. As soon as you click on it, you'll get a new button "Restart" at the bottom-right corner of the window.

Windows 7 & Vista


Cleanly kill Explorer Task

To cleanly exit Explorer process in Windows 7/Vista, right-click on the Shut down button  while simultaneously hold down keys <Ctrl>to reveal Exit Explorer.


Windows 7 & Vista Hack Way we all have used

Restarting the Explorer Task

To restart Explorer, the best tool to use is Process Explorer by Microsoft Windows Sysinternals.
Sysinternals is a specialty division exploring advanced system utilities for Windows IT Professionals.   

  1. Download and unzip to c:\windows\system32 folder.
  2. Run procexp.exe, and right-click on explorer.exe task and select Restart.


Windows Sysinternals Process Explorer download latest version

Windows Sysinternals Process Explorer page